Why Dental Restorations Fail — And How IDS Prevents It
By Dr. Gautam Shetty | Redefine Dental Clinic, Mumbai
Meta Description: Learn why most dental restorations fail silently — and how Immediate Dentin Sealing (IDS) delivers 50–58 MPa bond strength vs just 11.58 MPa with delayed bonding. Evidence-based restorative dentistry at Redefine Dental Clinic, Mumbai.
Focus Keywords: Immediate Dentin Sealing, IDS dentistry, dentin bonding, bond strength, biomimetic dentistry, restorative dentistry Mumbai, dental restoration longevity, MDP adhesive, Clearfil SE Bond, hybrid layer dentistry
Secondary Keywords: IDS vs DDS, micro-tensile bond strength, MMP inhibition, chlorhexidine dentin conditioning, deep margin elevation, circle of death dentistry, dental bonding protocol, indirect restoration, dentin sealing before impression
Introduction: The Silent Failure Nobody Talks About
Most dental restorations do not fail dramatically. They do not fall out on day one, or crack loudly, or make themselves immediately obvious. They fail slowly, invisibly, and at a molecular level — deep inside the interface between tooth and material where no eye and no X-ray can easily reach.
By the time a patient returns with sensitivity, a chipped margin, or recurrent decay, the failure has already been in progress for months, sometimes years. The restoration looks intact. But underneath, the bond has been quietly degrading since the day it was placed.
This is the clinical reality that restorative dentistry does not discuss often enough. And after years of practising at Redefine Dental Clinic in Mumbai, it is the reality that drives every protocol decision we make.
The good news is that this failure is not inevitable. It is not a material problem. It is not a patient compliance problem. In the vast majority of cases, it is a timing and protocol problem — one that has a clear, evidence-based solution: Immediate Dentin Sealing (IDS).
This article is written for dentists, dental students, and patients who want to understand why restorations last or fail, what the science actually says about bonding protocols, and what the gold standard of modern restorative dentistry looks like in clinical practice.
Part 1: Understanding Dentin as a Bonding Substrate
Before we can understand why Immediate Dentin Sealing is so important, we need to understand what makes dentin so challenging to bond to in the first place.
The Unique Biology of Dentin
Dentin is not enamel. That distinction sounds obvious, but its clinical implications are profound. Enamel is a highly mineralised, relatively homogenous structure — it bonds predictably and consistently. Dentin is an entirely different challenge.
Dentin is a living, fluid-filled biological tissue. It contains approximately 45,000 to 65,000 dentinal tubules per square millimetre in its deeper zones, each one filled with dentinal fluid under positive hydraulic pressure from the pulp. This fluid constantly moves outward toward the oral cavity — a phenomenon driven by pulpal pressure that averages between 14 and 28 cm of water.
When you cut into dentin during cavity preparation, you are not creating a clean, dry, inert surface. You are opening a dynamic biological system that is actively working against your bonding efforts. The moment preparation is complete, dentinal fluid begins seeping into the exposed tubules, contaminating the surface, and competing with your adhesive for access to collagen binding sites.
This is why dentin bonding is fundamentally more complex than enamel bonding — and why the window of opportunity to achieve optimal bonding is narrower than most textbooks acknowledge.
Tubule Density and Bond Strength
One of the most important and underappreciated concepts in dentin bonding is the inverse relationship between tubule density and achievable bond strength. This is not a minor variable — it fundamentally determines what is possible at any given location in the tooth.
Superficial dentin (just below the dentino-enamel junction) contains approximately 15,000 to 20,000 tubules per square millimetre, with individual tubule diameters of only 0.5 to 0.9 micrometres. At this depth, the ratio of intertubular dentin (where resin actually bonds) to tubule openings (where fluid escapes) strongly favours bonding. Micro-tensile bond strength values of 38 to 45 MPa are achievable in superficial dentin with a properly executed total-etch protocol.
Deep dentin (near the pulp) tells a completely different story. Tubule density rises to 45,000 to 65,000 per square millimetre. Tubule diameters widen to 2 to 3 micrometres. The surface is now dominated by tubule openings rather than intertubular dentin. Fluid outflow increases dramatically. Bond strength in deep dentin drops to 15 to 25 MPa even with optimal technique — not because of poor execution, but because of the fundamental biology of the substrate.
Understanding this gradient is essential for clinical decision-making. It explains why a restoration placed near the pulp will always be more vulnerable than one confined to superficial dentin, why deep caries cases require biobase materials and conservative excavation strategies, and why the bonding protocol must be adapted based on preparation depth.
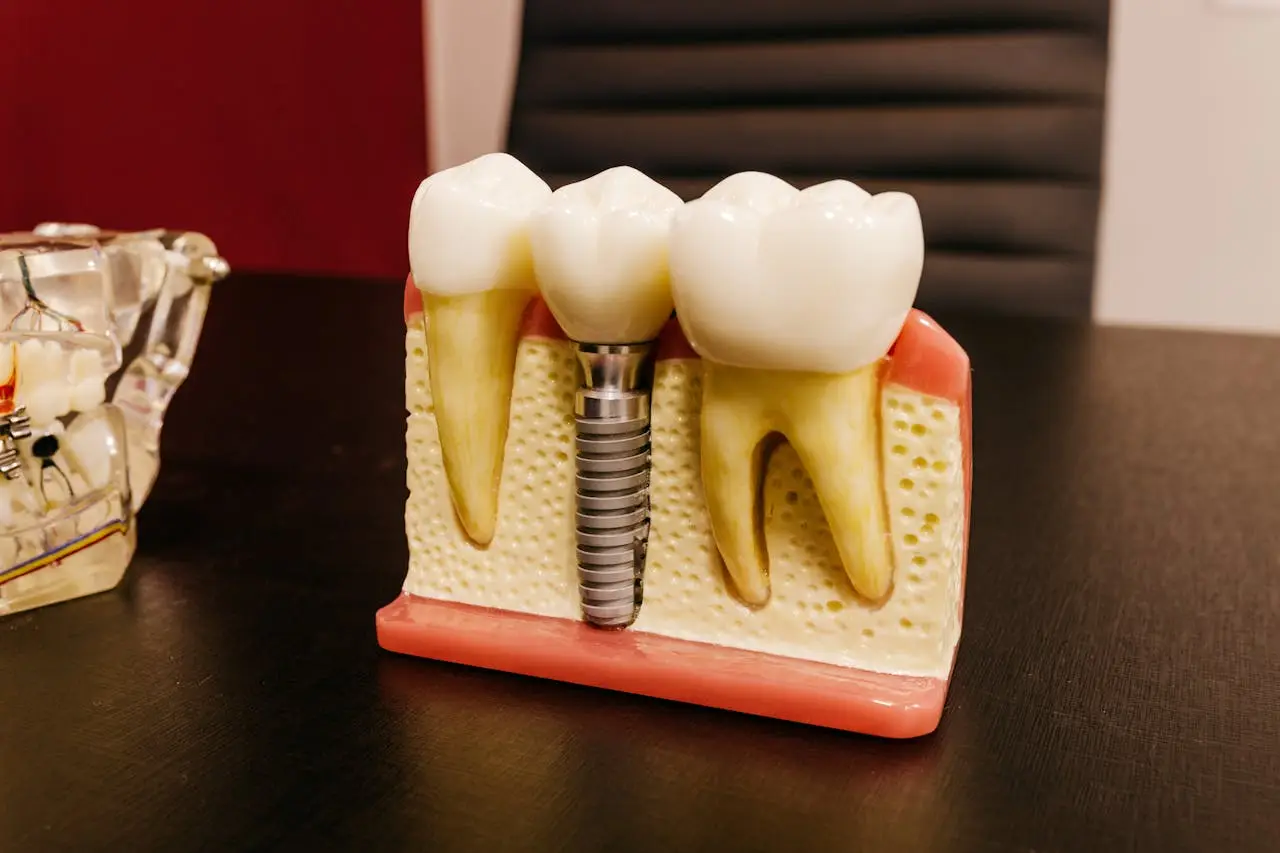
The Hybrid Layer: The Foundation of Everything
In 1982, Professor Nakabayashi described a discovery that would fundamentally redefine restorative dentistry. He identified a zone at the resin-dentin interface where acid etching had dissolved the mineral from dentin, leaving behind a scaffold of exposed collagen fibrils — and where resin monomers had infiltrated and polymerised within that scaffold, creating a new biomaterial that was neither pure resin nor pure dentin.
He called it the hybrid layer. And it remains, to this day, the single most important structural element in adhesive dentistry.
The hybrid layer is where bond strength actually lives. It is the micromechanical interlocking zone that, when formed correctly, produces bond strengths exceeding 30 MPa and failure modes classified as cohesive — meaning the material itself fractures before the bond does, which is the strongest possible outcome in restorative testing.
When the hybrid layer is incomplete — due to over-etching, under-etching, inadequate resin infiltration, or moisture contamination — bond strength drops precipitously. And without adequate bond strength at the dentin interface, every restoration is living on borrowed time.
Part 2: The Protocol Problem — Why Most Restorations Are Set Up to Fail
The Traditional Sequence and Its Fatal Flaw
For decades, the standard protocol for indirect restorations followed this sequence: prepare the tooth, take the impression, place a temporary restoration, send to the laboratory, cement the final restoration at a second appointment. Bonding happened at cementation — the final step of the process, often weeks after preparation.
This sequence has one catastrophic flaw. It treats dentin bonding as the last step in the process. But in terms of biology, it needs to be the first.
Here is what happens to dentin in the interval between preparation and cementation:
From the moment cavity preparation is complete, the freshly cut dentin surface begins to change. Dentinal fluid resumes its outward movement through the now-open tubules. Protein components from the fluid begin to deposit on the surface. Provisional cement, even when carefully placed, introduces contaminants. Temporary materials interact chemically with the dentin surface. The smear layer — a layer of debris created by cutting — undergoes changes that make subsequent bonding more difficult.
By the time the patient returns for cementation and you finally apply your bonding agent, you are no longer bonding to freshly cut, uncontaminated dentin. You are bonding to a surface that has been compromised in multiple ways over multiple weeks.
The data on what this means for bond strength is stark.
Delayed Dentin Sealing (the traditional approach): 11.58 MPa.
That is not a typo or a selective data point. Studies by Magne and Nielsen (2009) using micro-tensile bond strength testing demonstrated that delayed dentin sealing — bonding at cementation — produces average bond strengths of approximately 11.58 MPa. This is the clinical reality of the approach that most of the profession still uses as standard practice.
What 11.58 MPa Actually Means
To put 11.58 MPa in context, consider that the masticatory forces experienced by posterior teeth during normal function range from 200 to 800 Newtons. For a bonded indirect restoration to survive cyclical loading, thermal cycling, and the stresses of normal function over years, bond strength needs to be substantially higher than the minimum threshold.
At 11.58 MPa, bond failure is not a possibility — it is a statistical near-certainty over time. The failure mode associated with delayed dentin sealing is interfacial failure, meaning the bond breaks at the interface between tooth and material. This is the weakest possible failure mode. It produces microleakage, bacterial ingress, secondary decay, sensitivity, and eventual restoration failure.
This is the mechanism behind what we call the Circle of Death — the clinical pattern where a patient cycles repeatedly through restoration, failure, more extensive restoration, root canal, crown, and eventually extraction. Each cycle is more destructive than the last. And in many cases, the entire cycle was set in motion by a bonding protocol that was executed too late.
Part 3: Immediate Dentin Sealing — The Gold Standard Explained
What Is Immediate Dentin Sealing?
Immediate Dentin Sealing (IDS) is defined as the application of a dentin bonding agent to freshly cut dentin immediately after preparation and before impression-taking or provisionalization.
It is not a new material. It is not an expensive upgrade. It is a change in when bonding occurs — and that timing difference produces results that are, by every measurable clinical and laboratory metric, dramatically superior to delayed bonding.
The concept was formalised and popularised largely through the work of Dr. Pascal Magne, whose research demonstrated the extraordinary bond strength advantages of immediate sealing and whose clinical protocols have been adopted by progressive restorative dentists worldwide.
At Redefine Dental Clinic, IDS is not an optional enhancement. It is the standard of care for every indirect restoration we place.
The Numbers That Change Everything
The micro-tensile bond strength data for Immediate Dentin Sealing is unambiguous:
Immediate Dentin Sealing: 50 to 58 MPa.
Compare that to the 11.58 MPa of delayed bonding. That is a 4 to 5 times improvement in bond strength — on the same tooth, with the same adhesive, executed by the same hands. The only variable is timing.
At 50 to 58 MPa, the failure mode shifts from interfacial to cohesive. The bond itself is no longer the weak link. The material or the tooth structure fails before the bond does — which is the definition of optimal bonding outcome.
Why Freshly Cut Dentin Is Uniquely Bondable
The biological explanation for why IDS produces such dramatically superior results lies in the nature of freshly cut dentin.
Immediately after preparation, dentin is in its most bondable state. The mineral content is intact, the collagen network is undisturbed, the surface is uncontaminated, and the tubules — while open — have not yet been subjected to prolonged fluid exposure or contamination from provisional materials.
This is what we call the Window of Opportunity. And it is narrower than most practitioners appreciate.
Within the first few minutes after preparation, tubular fluid begins to rise in the exposed tubules. Within 30 minutes, surface contamination has begun. By the time a temporary restoration has been placed and worn for two to three weeks, the surface has undergone changes that fundamentally compromise its bondability.
The solution is not to develop better cements or stronger adhesives. The solution is to bond when dentin is in its peak state — immediately after you create it.
The Hybrid Layer Advantage of IDS
When you apply a dentin bonding agent to freshly cut, uncontaminated dentin, the conditions for ideal hybrid layer formation are optimal. The collagen network is fully expanded, hydrated, and accessible. The etched surface — whether created by phosphoric acid in a total-etch protocol or by the self-etch primer itself — is in its most receptive state.
The resin monomers infiltrate fully and uniformly into the demineralised collagen scaffold. The hybrid layer that forms is homogenous, interpenetrated, and stable. This is a true hybrid layer — resin and biological tissue fused at the molecular level, mimicking the structural properties of the dentino-enamel junction itself.
IDS also allows the bond to mature undisturbed. Once the bonding agent is applied and cured, the hybrid layer polymerises and strengthens over hours and days. By the time the patient returns for cementation and the final restoration is luted into place, the bond has had weeks to mature — completely protected from the hydraulic pressures and mechanical stresses of luting procedures.
This is a fundamental reversal of the traditional protocol, and it is why the results are so dramatically different.
Part 4: The Role of Chlorhexidine and Dentin Conditioning
Matrix Metalloproteinases — The Hidden Enemy of Bond Longevity
Even a perfectly formed hybrid layer is not immune to degradation over time. The mechanism of long-term bond failure in composite restorations has been investigated extensively over the past two decades, and the findings point to a class of enzymes called Matrix Metalloproteinases (MMPs).
MMPs are zinc-dependent endopeptidases that are naturally present in dentin matrix. They include MMP-2, MMP-8, MMP-9, and MMP-3, among others. In intact dentin, these enzymes are latent — held inactive by their mineral environment. But the moment acid etching is performed as part of the bonding protocol, the mineral is removed and the MMPs are activated.
Once activated, MMPs begin digesting the collagen scaffold within the hybrid layer. This degradation is not acute — it occurs over months and years, silently reducing the structural integrity of the bond interface. The clinical result is progressive bond strength loss, nanoleakage, and eventual restoration failure — even in restorations that appeared perfectly executed at placement.
Studies have demonstrated that without MMP inhibition, bond strength can drop by 35 to 40% over five years — a staggering figure that explains the frustrating clinical reality of restorations that perform adequately initially but fail within three to five years.
Chlorhexidine 2% as an MMP Inhibitor
The most clinically accessible and evidence-supported solution for MMP inhibition is the application of 2% Chlorhexidine (CHX) as a cavity disinfectant and dentin conditioner before bonding.
CHX inhibits MMP activity through its ability to bind to and chelate the zinc and calcium ions that MMPs require for enzymatic activity. Without these cofactors, the enzymes cannot function. CHX also demonstrates significant substantivity — it binds to hydroxyapatite and collagen within dentin and continues to exert inhibitory effects long after its initial application, providing residual antibacterial and anti-enzymatic protection.
The clinical evidence for CHX use in adhesive dentistry demonstrates statistically significant preservation of bond strength over time:
- Without CHX, bond strength at five years averages 40 to 45% of initial values
- With CHX application (5-minute contact time), bond strength at five years is preserved at 75 to 80% of initial values
- That difference represents approximately a 35 to 40% improvement in bond longevity — measurable, clinically significant, and achievable with a material that costs virtually nothing per application
Why Five Minutes Is the Non-Negotiable Minimum
The contact time of CHX application is perhaps the most frequently misunderstood and most frequently compromised aspect of the protocol. Many practitioners apply CHX for 30 seconds or a minute and move on. The research is unequivocal: this is insufficient.
Five minutes is the minimum contact time for clinically relevant CHX application, and this duration is based on the biophysics of the process, not clinical convention.
MMP binding by CHX is a saturation kinetics process. CHX molecules must access and bind to MMP binding sites within the dentin matrix — and this requires both adequate concentration (2%) and adequate time (5 minutes) to achieve complete saturation. Studies of CHX diffusion through dentin demonstrate that at 2% concentration, approximately 5 minutes is required to achieve sufficient tubule penetration depth and complete receptor saturation.
At less than 5 minutes, MMP inhibition is partial. Some enzyme sites remain unbound. Collagen degradation continues from those unprotected sites. The long-term bond preservation benefit is proportionally reduced.
At 5 minutes, binding sites are fully saturated. MMPs are comprehensively inhibited. Long-term bond strength preservation is maximised.
There is no clinical benefit to extending application beyond 5 minutes — receptor saturation has occurred, and prolonged application risks over-wetting the dentin surface, which can interfere with adhesive penetration.
The protocol is simple and the evidence is clear: CHX 2%, applied after etching (in total-etch protocols) or after air abrasion (in self-etch protocols), for exactly 5 minutes, followed by gentle air-drying before bonding.
Part 5: Air Abrasion — Surface Preparation for Optimal Bonding
The Role of Air Abrasion in Modern Restorative Protocols
Air abrasion with aluminium oxide particles is a powerful adjunct to conventional cavity preparation and bonding protocols. Understanding the parameters of air abrasion — particle size and working pressure — is essential for achieving the surface characteristics that optimise bonding rather than compromise it.
The most important clinical decision in air abrasion is particle size selection. Two sizes are primarily used in restorative dentistry:
27 micrometre aluminium oxide is the standard for bonding surface preparation. At this size, the abrasive creates an ideal micro-roughness profile — opening tubule mouths, removing smear layer debris, and increasing surface area for adhesive penetration without removing excessive dentin or creating surface irregularities that impair resin flow and contact. Bond strength studies consistently show 27 micrometre Al₂O₃ air abrasion, followed by acid etching, produces superior results compared to acid etching alone.
50 micrometre aluminium oxide is intended for more aggressive applications — metal surface preparation, ceramic conditioning, and removal of old restorations. It should never be used for composite bonding preparation. At 50 micrometres, particles are large enough to over-roughen dentin, creating surface irregularities that prevent uniform resin contact, compact debris into tubules rather than clearing them, and generate sufficient heat and vibration stress to create microcracks in dentin. The result is paradoxically lower bond strength compared to more conservative preparation.
Working pressure also requires careful calibration. For dentin preparation prior to bonding, 40 to 80 psi (approximately 280 to 550 kPa) is the appropriate range. Higher pressures increase the risk of pulpal stress, particularly in deep preparations, and can drive abrasive particles into exposed dentinal tubules where they impair adhesive penetration.
Air Abrasion and Biobase Compatibility
When a biobase material — such as Biodentine, TheraCal LC, or a calcium hydroxide liner — has been placed over the pulpal floor, air abrasion protocol must be significantly modified.
The crystalline structure of calcium silicate-based biobases (Biodentine and similar materials) is particularly vulnerable to 50 micrometre abrasion. Particles of this size can fracture the surface of the set material, dislodge the calcium silicate matrix, and breach the critical seal between biobase and dentin. If a biobase has been placed, the only acceptable options are to use 27 micrometre particles at very low pressure (25 to 30 psi) for a maximum of 2 seconds, or — preferably — to avoid air abrasion on the biobase entirely and proceed directly to bonding after appropriate surface conditioning.
The clinical hierarchy is straightforward: when in doubt, leave the biobase alone. Its primary function is protection and seal — any intervention that compromises that seal defeats its entire purpose.
Part 6: Adhesive Systems — Choosing the Right Bond for the Right Situation
The Generation Framework and Its Clinical Meaning
The classification of dental adhesives by generation is more than historical taxonomy — it reflects fundamental differences in chemistry, clinical workflow, sensitivity requirements, and bond strength outcomes that directly affect restoration longevity.
4th and 5th generation adhesives (total-etch systems) represent the gold standard for pure bond strength to enamel. They use separate phosphoric acid etching (typically 37% concentration, 15 seconds on dentin, 30 seconds on enamel), a separate primer, and a separate adhesive. This three-bottle (or two-bottle) approach is technique-sensitive — moisture control is critical, over-drying collapses the collagen scaffold and reduces bond strength, and over-etching creates an infiltration gap at the base of the hybrid layer that MMP activity will exploit over time. When executed correctly, total-etch systems on superficial dentin produce the highest achievable micro-tensile bond strength values: 38 to 45 MPa.
6th generation adhesives (self-etch systems) combine etching and priming in a single step. Their lower pH (typically 1.5 to 2.5) creates a shallower demineralisation pattern (1 to 3 micrometre hybrid layer versus 5 to 8 micrometres with total-etch) that is precisely matched by the resin infiltration capability of the same product. This eliminates the critical risk of creating a demineralised zone deeper than resin can infiltrate — the most common and most damaging error in total-etch bonding. Self-etch adhesives partially incorporate the smear layer rather than removing it entirely, creating a buffered, well-adapted interface that is more forgiving of technique variation and produces significantly lower post-operative sensitivity.
7th generation and universal adhesives (all-in-one systems) combine acid, primer, and adhesive in a single bottle. While convenience is maximised, bond strength is compromised. The internal contradiction of a system that must be both acidic enough to etch and then immediately neutral enough to polymerise creates a product that does neither as well as dedicated systems. Bond strengths of 15 to 20 MPa are typical — adequate for low-stress, non-load-bearing applications, but insufficient as the primary bonding system for posterior indirect restorations.
The MDP Monomer — Why It Matters More Than the Generation Label
Perhaps the single most important advance in adhesive dentistry in the past two decades is the development and incorporation of 10-MDP (10-Methacryloyloxydecyl Dihydrogen Phosphate) into bonding systems.
MDP is a functional monomer with a unique bifunctional molecular architecture. Its phosphate head group forms a true ionic chemical bond to hydroxyapatite in dentin — not a mechanical interlocking relationship, but an actual chemical bond to tooth mineral. Its methacrylate tail group copolymerises with the resin matrix of the adhesive, creating a continuous molecular chain from tooth mineral through adhesive to restoration.
This chemical bonding to hydroxyapatite is qualitatively different from the purely micromechanical retention of conventional bonding systems. It produces enhanced bond stability, particularly in wet and thermally cycling conditions. It reduces nanoleakage. And when MDP is incorporated in high purity formulations, it consistently produces the highest bond strength longevity data in the peer-reviewed literature.
MDPB (Methacryloyloxydecyl pyridinium bromide) represents a further evolution — combining MDP’s bonding chemistry with the antibacterial activity of benzalkonium bromide. MDPB not only bonds chemically to tooth structure but also kills residual bacteria in the cavity, reducing the risk of secondary caries at the margin. Clearfil SE Protect (Kuraray Noritake) contains MDPB and represents the most clinically supported antibacterial bonding agent currently available.
Based on the clinical evidence, MDP purity, two-step workflow stability, and length of clinical data, the top-tier adhesive systems currently available are:
- Clearfil SE Protect (with MDPB) — most durable, lowest sensitivity, longest clinical data, antibacterial
- Clearfil SE Bond 2 — 6th generation, classic MDP formulation, extremely well-studied
- Kerr Optibond XTR — high MDP content, excellent universal application data
At Redefine Dental Clinic, we use Clearfil SE Bond as our primary adhesive system for IDS protocols in indirect restorations. Its combination of 6th generation self-etch workflow, MDP chemistry, and decades of clinical validation makes it the most appropriate choice for immediate dentin sealing where bond longevity is the primary concern.
Part 7: The IDS Protocol — Step by Step
The Complete IDS Workflow at Redefine Dental Clinic
The following protocol represents the evidence-based IDS workflow we follow for every indirect restoration at Redefine Dental Clinic. Each step has a specific rationale rooted in the biology of dentin bonding and the chemistry of adhesive systems.
Step 1: Cavity Preparation
Preparation is completed to the appropriate depth and geometry, with sound tooth structure at all margins. Internal line angles are rounded to distribute stress and reduce crack propagation risk. Where a biobase is indicated (deep caries approaching pulp), Biodentine or TheraCal LC is placed and allowed to set before bonding steps begin. Air abrasion with 27 micrometre aluminium oxide at 40 to 60 psi is performed to remove smear layer and open tubule mouths.
Step 2: Chlorhexidine 2% Application
For self-etch protocols, CHX is applied immediately after air abrasion, directly to the prepared surface. For total-etch protocols, CHX is applied after phosphoric acid etching and rinsing. In both cases, CHX is allowed to remain in contact with the dentin surface for a full 5 minutes — not 30 seconds, not 2 minutes. This is non-negotiable for adequate MMP inhibition. After 5 minutes, the surface is gently air-dried for 10 to 15 seconds to remove excess moisture while preserving dentin hydration.
Step 3: Clearfil SE Bond Application (IDS)
Clearfil SE Bond primer is applied to the entire prepared surface and left undisturbed for 20 seconds. This self-etching primer simultaneously conditions the dentin surface and delivers MDP monomers to the hydroxyapatite substrate, initiating chemical bonding. After the waiting period, the primer is gently air-dried to allow solvent evaporation. The adhesive resin is then applied as a thin, even layer and light-cured for 20 seconds.
Step 4: Thin Flowable Resin Coating
A thin layer of flowable composite resin is applied over the cured adhesive to create what we call an elastic cavity wall. This layer serves multiple functions: it reinforces the hybrid layer by adding bulk resin over the bonding interface, it creates a flexible resin-rich zone that accommodates thermal stress, and it protects the bonded surface from contamination during impression-taking and temporary restoration. The flowable layer is light-cured for 40 seconds.
Step 5: Glycerin Application and Final Cure
Glycerin gel (an air-block barrier) is applied over the entire IDS surface and a final light-cure of 40 seconds is performed. This step is critical and frequently omitted — it eliminates the oxygen inhibition layer that forms on the surface of cured resin in the presence of atmospheric oxygen. The oxygen inhibition layer is a thin zone of incompletely polymerised resin at the surface that, if left uncured, will interfere with the cementation interface when the final restoration is bonded. Eliminating it with glycerin and a final cure ensures a fully polymerised, clean surface for final cementation.
Step 6: Margin Refinement and Impression
The preparation margins are refined with fine diamond burs to remove any resin flash that has extended onto the enamel margins. The IDS surface is now complete. The impression is taken in this session — the dentin surface is sealed, protected, and free of contamination. The patient leaves with a temporary restoration placed over a prepared surface that is already bonded, protected, and beginning its maturation period.
Step 7: Final Cementation
At the cementation appointment, the IDS surface requires only gentle cleaning — no re-etching, no re-bonding. The final restoration is luted using a resin cement compatible with the MDP-containing adhesive system. The bond that was formed weeks earlier at the most bondable state of the dentin surface is now mature, strong, and ready to support decades of function.
Part 8: The Peripheral Seal Zone and Avoiding the Circle of Death
Zone 1: The Most Important Millimetres in Restorative Dentistry
Bond strength and protocol excellence are only part of the equation for restoration longevity. The other critical factor is what we call Zone 1 — the peripheral seal zone of sound tooth structure surrounding the cavity preparation.
Zone 1 is the band of intact, mineralised tooth structure, ideally 2 to 3 millimetres wide, that encircles the entire preparation margin. Its function is structural — it distributes occlusal forces away from the restoration margin, prevents stress concentration at the bonded interface, and provides a stable peripheral seal that prevents marginal breakdown.
When Zone 1 is adequate (2 to 3 millimetres of sound peripheral dentin and enamel all around the preparation), the restoration has structural support from the tooth itself. Occlusal loads are distributed through this sound structure rather than concentrated at the adhesive interface.
When Zone 1 is inadequate — thin walls, undercut margins, remaining tooth structure less than 1.5 millimetres thick — the restoration is mechanically unsupported. Every occlusal force concentrates at the weakest points: the adhesive margins. Micro-cracks initiate and propagate. The Circle of Death begins.
Breaking the Circle of Death
The Circle of Death is not metaphor — it describes a clinical trajectory that is heartbreakingly common:
- Large restoration placed without adequate peripheral seal
- Marginal breakdown leads to microleakage and secondary caries
- Restoration is replaced, requiring more tooth removal
- Next restoration has even less peripheral structure
- Cusps fracture under loading
- Root canal treatment is required
- Crown is placed — often on a structurally compromised tooth
- Crown fails or the tooth fractures vertically
- Extraction
Every step in this cycle was the predictable consequence of inadequate Zone 1 from the beginning. The tragedy is that with proper assessment and appropriate intervention before the first restoration, the entire cycle could often have been avoided.
Deep Margin Elevation: When the Margin Is Below the Gumline
One of the most common scenarios that forces Zone 1 compromise is the subgingival margin — a preparation margin that extends below the gingival crest, making it inaccessible for direct bonding, impression-taking, and final restoration placement.
Subgingival margins create problems at every stage of the restorative process: they cannot be properly isolated for bonding, they contaminate impressions with sulcular fluid and blood, they prevent adequate margin finishing, and they make it impossible to establish the peripheral seal zone on which restoration longevity depends.
The traditional response to subgingival margins has been to either accept them and work around their limitations, or to perform surgical crown lengthening to expose the margin. Both solutions have significant drawbacks.
Deep Margin Elevation (DME) offers a third option that is more conservative, faster, and — when executed correctly — clinically equivalent to crown lengthening for margins that respect biologic width.
DME involves using direct composite resin to elevate the subgingival margin to a supragingival position before the final restoration is designed and fabricated. The composite is bonded directly to the tooth at the subgingival margin, building up enough bulk to bring the effective margin above the gingival crest. The indirect restoration then bonds to composite rather than directly to the inaccessible tooth margin.
The key biological requirement for DME is respect for biologic width — the combined dimension of junctional epithelium (approximately 0.97 mm) and connective tissue attachment (approximately 1.07 mm) that constitutes approximately 2 millimetres of biologically protected space between the alveolar bone crest and the gingival margin. Any restoration margin placed within this 2-millimetre zone will chronically violate the attachment and create persistent inflammation, bone resorption, and ultimately periodontal breakdown.
DME is appropriate when:
- The subgingival margin is accessible after retraction
- Biologic width is not violated (margin is not within 2 mm of bone crest)
- The tooth structure at the base of the subgingival defect is sound
- No vertical fracture is present
When biologic width has been violated — when the margin extends to within 2 millimetres of the bone crest — surgical crown lengthening becomes mandatory before any restorative intervention.
Part 9: Long-Term Bond Preservation — The Five-Year View
What Happens to Bonds Over Time
Immediate Dentin Sealing addresses the establishment of bond strength. MMP inhibition with CHX addresses its preservation. Together, these two interventions produce restoration longevity data that is qualitatively different from conventional protocols.
The five-year bond strength data for different protocols tells a revealing story:
Total-etch 3-step with CHX and IDS: approximately 78% of initial bond strength preserved at five years. This is the gold standard outcome — a restoration that began at 50 to 58 MPa retains more than three-quarters of that strength after five years of function.
Total-etch without CHX, with conventional timing: approximately 42% of initial bond strength at five years. More than half the initial bond strength has been enzymatically degraded.
All-in-one universal adhesive without IDS: approximately 28% of initial bond strength at five years. At this level, marginal breakdown and restoration failure are essentially inevitable within the following one to two years.
These are not marginal differences. They represent the gap between a restoration that serves a patient for 20 years and one that fails in five. And the protocol difference between the best and worst outcomes is not expensive materials or advanced equipment — it is technique, timing, and the willingness to follow evidence-based steps with consistency.
The Investment Case for IDS
From a patient perspective, IDS represents extraordinarily good value for money. The additional time and material cost of performing IDS — primarily the bonding agent and approximately 10 extra minutes of chairtime — is negligible compared to the cost of restoration failure, retreatment, and the progressive tooth destruction that follows inadequate bonding.
A restoration that lasts 20 years instead of 5 does not just save money. It saves tooth structure, avoids the biological cost of multiple preparations, reduces lifetime exposure to dental interventions, and preserves the structural integrity of the tooth for the decades ahead.
At Redefine Dental Clinic, we present IDS to patients not as an optional upgrade but as the standard of care — because the evidence does not support offering patients a protocol that delivers one-quarter the bond strength longevity of the gold standard.
Part 10: Clinical Decision-Making — When to Use Which Approach
The Protocol Decision Tree
Clinical situations vary, and the optimal bonding approach is not identical for every preparation. The following framework guides clinical decision-making at Redefine Dental Clinic:
Direct composite restoration, superficial dentin, enamel dominant: Total-etch 3-step system with CHX 5-minute conditioning. The enamel margins benefit from the superior etch depth of phosphoric acid, and superficial dentin tolerates the protocol well.
Direct composite restoration, deep dentin, near pulp: Self-etch 6th generation system (Clearfil SE Bond) with CHX applied before self-etch primer. The milder pH of self-etch adhesives is better tolerated by deep dentin and produces less post-operative sensitivity. Biobase placement should be evaluated when pulp proximity is less than 0.5 millimetres remaining dentin.
Indirect restoration (ceramic, composite, or hybrid ceramic): IDS protocol as described above — mandatory for all indirect cases regardless of preparation depth. The gap between IDS and DDS bond strength (50 to 58 MPa vs 11.58 MPa) is too large to justify any departure from immediate sealing.
Sclerotic dentin (old caries, wear, aged surfaces): Self-etch adhesives perform better than total-etch on sclerotic dentin. Hypermineralised tubule plugs that resist phosphoric acid etching are partially solubilised by self-etch primers, allowing some degree of tubule access. Air abrasion with 27 micrometre aluminium oxide at moderate pressure (40 to 60 psi) is beneficial for mechanically disrupting the sclerotic surface before adhesive application. Extended acid etch time (30 to 60 seconds) may be considered for total-etch protocols on sclerotic surfaces.
Biobase-covered preparations: Avoid air abrasion on set biobase. Use self-etch adhesive directly on biobase surface — the mild acidity activates surface calcium ions for adequate adhesion without disrupting the material. Do not use total-etch phosphoric acid directly on calcium silicate biobases as the high acidity can damage the material surface.
Conclusion: Protocol Discipline Is the Difference Between Restorations That Last and Restorations That Don’t
The science of modern adhesive dentistry has given us the tools to place restorations that routinely last 20 years or more, that preserve tooth structure, that eliminate post-operative sensitivity, and that protect pulps through chemical and biological sealing of the dentinal tubule system.
Those tools are not exotic or expensive. Chlorhexidine 2% costs almost nothing. Air abrasion with 27 micrometre aluminium oxide is widely available. Clearfil SE Bond is a well-established, competitively priced adhesive. The addition of 10 minutes for IDS to an indirect restoration appointment is a negligible time investment.
What requires investment is the discipline to follow evidence-based protocols without shortcuts, the commitment to continue education as the science evolves, and the understanding that every clinical decision made today has consequences that will play out in a patient’s mouth over the next two decades.
The Circle of Death is not inevitable. The silent failure of restorations that took years to create does not have to be accepted as a normal clinical outcome. The path to restoration longevity — to biomimetic dentistry that truly serves patients over the long term — runs through the protocols described in this article.
At Redefine Dental Clinic, these are not aspirations. They are the daily standard of practice.
Frequently Asked Questions
Q: What is the difference between IDS and conventional bonding? IDS (Immediate Dentin Sealing) involves applying the bonding agent to dentin immediately after preparation, before impression-taking. Conventional or delayed dentin sealing involves bonding at cementation weeks later. The bond strength difference is dramatic — 50 to 58 MPa for IDS versus 11.58 MPa for delayed bonding.
Q: Does IDS increase treatment cost or time? IDS adds approximately 10 minutes to the preparation appointment and uses standard bonding materials already present in the dental clinic. The marginal cost is minimal. The benefit — dramatically improved restoration longevity — represents exceptional value for both patient and dentist.
Q: Why is chlorhexidine applied for 5 minutes and not less? Five minutes is the minimum contact time for CHX to achieve complete MMP receptor saturation in dentin. Less than 5 minutes produces partial MMP inhibition, leaving active enzymes that will degrade the hybrid layer over time. The 5-minute duration is established by diffusion kinetics and binding chemistry, not by convention.
Q: Is self-etch better than total-etch for all cases? Not universally. Total-etch produces higher bond strength to enamel and in superficial dentin when moisture control is perfect. Self-etch is superior for deep dentin, sclerotic dentin, cervical lesions, and any situation where post-operative sensitivity is a concern. For indirect restorations using IDS, 6th generation self-etch with MDP chemistry (Clearfil SE Bond) offers the most consistent long-term results.
Q: What is Deep Margin Elevation and when is it used? Deep Margin Elevation is a technique using direct composite resin to elevate a subgingival preparation margin to a supragingival position before indirect restoration fabrication. It is used when margins are below the gingival crest but biologic width has not been violated. It creates a Zone 1 peripheral seal that is essential for restoration longevity.
Dr. Gautam Shetty practises restorative and biomimetic dentistry at Redefine Dental Clinic, Mumbai. For consultations or to learn more about our restorative protocols, contact us at [clinic contact details].
This article is written for educational purposes for dental professionals and informed patients. Clinical protocols should be adapted to individual patient needs and clinical circumstances.
Suggested Internal Links:
- What is Biomimetic Dentistry? [link to related blog]
- Understanding Indirect Restorations — Ceramic Onlays vs Crowns [link]
- Why We Use Clearfil SE Bond — Our Adhesive Protocol Explained [link]
- The Circle of Death — How to Stop Tooth Loss Before It Starts [link]
Suggested External Links (authority citations):
- Magne P, Nielsen B. Interactions between impression making and adhesive cementation. J Prosthet Dent. 2009
- Perdigão J. New developments in dental adhesion. Dent Clin N Am. 2007
- Tjäderhane L et al. Optimizing dentin bond durability. Dent Mater. 2013